


Comb Collapse — How to Prevent It — How to Fix It
LAYENS HIVES and EQUIPMENT AVAILABLE FROM OUR STORE >>
Hives include all frames, fully assembled & ready to go
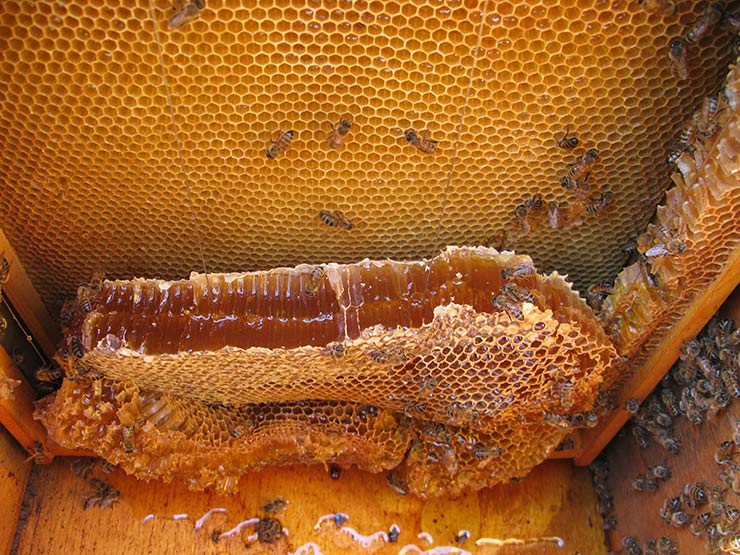
If the hive overheats, wax softens and honeycombs may sag or collapse. The heaviest combs — those filled with honey — tend to collapse first, especially those recently built of tender white wax. Another danger zone are combs farthest from the entrance (poor ventilation) and those against the south-facing wall getting full sun (excessive heat).
Combs sometimes founder in the wild nests, too, so bees know how to contain and repair the damage. But even small breakage can lead to colony’s ruin, especially if the queen is killed, or if small hive beetles take the opportunity to overrun the hive.
Unless the catastrophic comb collapse affects most of the hive’s combs, the queen is usually spared, found on the brood combs, which are lighter and often stronger, their cell walls reinforced with cocoons. But she may still die in the honey spilled on the floor of the hive, as do worker bees. Bees will attempt repairs by collecting spilled honey and moving it into undamaged cells, by reshaping and even salvaging wax to build new comb. If the collapse only affected two or three combs in the honey section of the hive, the colony may clean everything up and recover on its own, and you’ll discover evidence of repaired comb collapse at honey harvest time. But the ending is commonly not as happy as that.
The folds in the fallen comb create pockets where small hive beetles can breed, inaccessible to the bees. If these nooks contain protein (pollen, dark comb, or brood), small hive beetle larvae get the resources they needs to grow, and as they start devouring combs, the colony is doomed. The same happens if the queen gets caught up in liquid honey and dies: while the bees are raising a new queen, their population drops and their smaller numbers are no longer enough to keep the small hive beetles and their larvae out of the brood and pollen reserves.
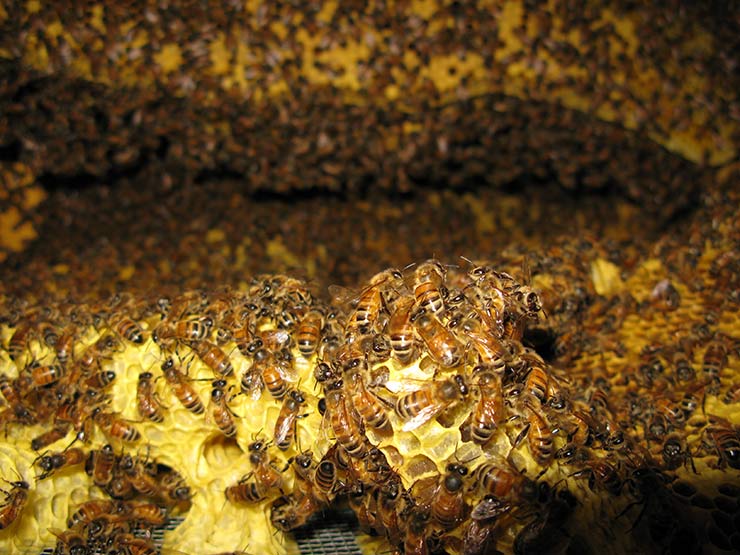
As workers drown in honey spilled on the bottom of the hive, and as combs get covered in small hive beetle larvae, bees sense danger and evacuate the hive, hanging on the front wall. Unlike the bearding caused by overheating or hive congestion that precedes swarming, bearding due to severe comb collapse or small hive beetle infestation is extreme, barely subsides at night, and continues for many days even if ambient temperatures drop. If the queen is still with them, the colony will likely abscond — fly off to start from scratch at a new location, leaving you with a pile of slimed collapsed combs teeming with wiggling beetle larvae.


How to Prevent Comb Collapse
Fortunately, comb collapse can be fully prevented even in very hot climates (think Texas, Georgia, or Arizona), and many recommendations are similar to how you stay safe in intense heat — “seek shade, drink plenty of liquid, and paint your house roof white!”
Comb collapse used to be a concern only in the south, but today, when you can get 100°F in North Dakota, many more colonies are affected no matter where you live. Bees are very good at building strong combs and regulating hive temperature, so with some simple precautions taken, comb collapse should never occur.
1. Put hives in full shade.
This is the basic hive placement recommendation made by Georges de Layens in Keeping Bees in Horizontal Hives (Section 71), expressly for preventing comb sagging or collapse (p. 86), and based on the observation that shaded forest environment is bees’ natural habitat. But today almost all beekeeping manuals recommend putting your hives in full sun. What to make of it?
Consider this: the recommendation for full-sun placement of beehives stems from the writings of the influential grandfathers of American beekeeping, who all lived in the north and did not experience the scorching-hot summer weather. L.L. Langstroth and A.I. Root kept bees in Ohio, Moses Quinby and G.M. Doolittle — in New York, C.C. Miller and Charles Dadant — in Illinois. For them, full-sun hive placement worked well as long as they kept their hives painted white.
Today, many beekeepers who put their hives in full sun use plastic comb foundation, which obviously cannot melt even in Arizona. However, if your bees build all-natural comb on foundationless frames or on 100% beeswax foundation, you should definitely protect your hives from overheating, and full shade is the easiest and most natural approach — actually, the one bees themselves prefer.
We know that swarms of bees choose well-shaded swarm traps over those in full sun, thus clearly stating their preference. If summer temperatures commonly exceed 90°F where you live, if you see bees bearding in hot weather and even discover comb collapse — you should probably heed Layens’s advice and put your hives in full or partial shade (or take other precautions described below).

Also, to make the right choice for your location, just look around and ask the question: in mid-summer, do animals and plants thrive here in full sun? Where I live in southern Missouri, the answer would be a definite no. Research showed that even “sun-loving” crops and fodder plants grow much better in partial shade. Cows hide in tree shade during the day, and graze during mornings and in the evenings. Fields turn yellow as grasses wilt (but vegetation is still green under the forest cover). Cicadas fall silent during the day and awaken late in the evening.
In the south the full sun can be even more deadly. One scientist glued strings (“leashes”) to the back of wild crabs to prevent them from hiding under rocks during the day. The result: all crabs in the experiment died, and the scientist earned points for publishing her research in a peer-reviewed journal. In a desert environment, plants that can’t store enough water in their tissues (like cacti) nor have deep root systems (like trees) hasten to bloom and bear seed in the spring, before being killed by the summer sun and lack of water.
So consider your climate. If you live in an area with relatively cool and wet summers (such as Pacific Northwest), full sun placement is the way to go.
The reason shade prevents comb collapse is this: hive overheating is not due to “hot weather” (say, air temperature of 110°F). Instead, it is due to solar gain — hive walls and roof absorbing sunlight, becoming hotter than air, and transferring this heat to the inside of the hive. For example, a hive roof covered in galvanized metal, in full sun, can be 75 degrees hotter than air (that is, 180°F on a 105° day). You almost placed your hive in an oven. The same metal roof in full shade will stay at about the ambient temperature.

From my own experience in southern Missouri (Zone 6; July-August temperatures commonly above 90°F and occasionally above 100°F). Full shade: no comb collapse ever. Partial shade: occasional comb sagging and limited infrequent collapse in hives with dark exterior (naturally aged wood) near the south-facing wall. Full sun: even with insulated Layens hives I would experience frequent comb collapse if I was not taking additional precautions discussed below.
Final note about shade: if you can place your hives in a shady spot, you almost don’t need to do anything else other than making sure bees have water. If you cannot put hives in full shade, comb collapse can still be reliably avoided — read on.
2. Use insulated hives.
Insulation works both ways: it protects bees from the cold in the winter, and from the heat in the summer. Insulation slows the transfer of heat from a higher-temperature object to the colder object. If your hive is well insulated, the heat generated by the bees in winter stays inside longer. In the summer, when the outside temperature is higher than the nest temperature, the heat takes longer to penetrate the hive, so the bees can maintain nest microclimate with less ventilation and no bearding.


3. Give bees access to water.
Bees cool their nest by bringing in water, spreading it on the comb, then fanning wings to evaporate it. This is called evaporative cooling and this is why humans perspired in hot weather (before inventing air conditioning) and why you feel cool when getting out of water. Plants use a similar process evaporating moisture from their leaves. So make sure there is a permanent source of water for your bees within 1/4 mile of the hives, and preferably much closer (200 yards). Watch out for ponds, puddles, and wet areas that collect runoff from agricultural fields — that water is often contaminated with agrochemicals and is toxic to the bees. If no reliable uncontaminated water source is available, create one right in the apiary (see Layens’s book, Section 73). For example, fill a bucket, a 55-gallon drum, or an old bathtub with water and cover with a thin layer of wood chips or slices of cork to serve as floats. Any artificial water trough needs regular replenishment.
In very hot climates where nights can stay hot, or for hives surrounded by surfaces that release a lot of heat during the night (e.g., pavement, concrete walls) adding a frame feeder filled with water straight into the hive is a good idea. (Cover water with wood chips so bees don’t drown.) You’d need to refill the feeder every few days, but it saves the bees the time and effort of flying to collect water outside the hive, and also makes water accessible late in the evening and during the night, when they can’t fly at all.
4. Paint the hive and the roof white.
In hot climates, unless your hive is in full shade, don’t paint it in dark colors. For example, green walls can absorb twice as much heat as white ones; galvanized steel roof will absorb much more heat than roofing metal painted white. Even a natural-wood surface (e.g., pine boards coated with linseed oil or paraffin wax) are much darker than white or light-colored paints. Note: if your hive has a peaked roof, roof color does not matter as much because the ample ventilated attic space offers excellent protection from overheating.
5. Shade the roof.
Of all the hive surfaces, shading the roof is the most important, because the crucial point of attachment of honeycomb is to the top bar of the frame. If the top bars of frames are heated from above, the wax comb attachment to the top bar weakens, the side bars alone can’t support the weight of heavy comb, and it sags or collapses. The following method is extremely helpful for hives exposed to the sun in hot weather.
Put two slats (“two-by-two”) across the flat roof, perpendicular to the long wall, and cover with any durable material creating at least 4” overhang on all four sides and a 1-1/2” air gap between the cover material and the roof. I use a piece of roofing metal (reclaimed “barn tin”), but painted plywood will last many years as well. This shades the roof, the cover material takes the brunt of solar radiation and heats up, but the air pocket prevents heat transfer to the inside of the hive lid.


Under extreme conditions, you will want to shade hive walls as well. Cardboard strapped to the walls (leaving some air gap between the walls and cardboard) may not look pretty, but serves well as an emergency measure during an intense heat wave for hives in full sun.
6. Don’t place hives near/over large sinks of heat or surfaces reflecting sun onto them.
There are two problems with placing a hive close to a sunlit wall or solid fence: it limits air movement around the hive and slows down heat dissipating from the hive’s surface, and it reflects part of the sun’s energy onto the hive, increasing its solar gain even further.
Likewise, avoid placing hives on full-sun decks, pavement, gravel, stone, or concrete. These materials heat up (pavement can reach 150°F and concrete 140°F), create a spot of very hot air around them, and exacerbate hive overheating to where severe comb collapse may be unavoidable. Of course bees will do all they can to cool their hive by ventilating, but it’s hard to stay cool if the air you are blowing into the door is 130°F.
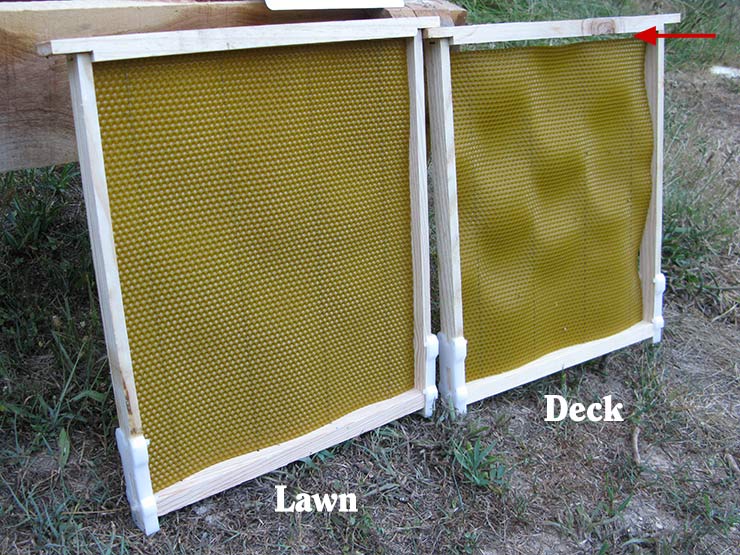
If your hive must be in full sun, grass or other vegetation is the best surface to put the stand on. Here is an experiment I did on a 100-degree day. Two identical swarm traps with foundation frames (no bees) in full sun; one is on the lawn and the other on the wooden deck two feet in front of the house south wall (tan vinyl siding). After only several hours of sun exposure I opened and checked both swarm traps. Foundation inside the trap-on-the-deck was badly warped and sagged, sliding down the wires. Foundation inside the identical trap-on-the-grass was slightly warped (still totally usable) and did not sag at all.


7. Good air drainage around the hive.
When air moves around a hot object, it takes some of the heat away. This is why it feels nice to have a fan pointed at you in a hot room. So air movement helps hives stay cooler even in very hot weather. Whenever possible, avoid pockets surrounded with vegetation or structures that prevent circulation of air.

8. Open top entrance.
If your hive has top entrance, fully open it in hot weather, in addition to the bottom entrance. If your hive has no top entrance and is commonly exposed to the sun in temperatures over 90°F, drill a 1-1/4” top entrance, centered right-left on the wall, 3” on-center from the top of the front wall. (If you add top entrance to an insulated Layens hive with wool between the walls, make sure it has a wood block behind where you are drilling or exclude bees’ access to the wool by gluing a piece of PVC pipe inside the drilled opening.)
Note: if your hive experiences heavy robbing pressure (common when you have multiple strong colonies during dearth), have only top entrance open (put the bottom entrance on ventilation / screen setting). A common sign of elevated robbing alert is when bees crowd the entrance to prevent robber and vermin entry.
9. Open central entrance.
If your hive has several entrances (e.g., left, center, and right on the insulated Layens hive), have the center entrance open in hot weather. This minimizes the distance bees have to move air to ventilate frames in the depth of the hive. (E.g., in the 20-frame hive with the side entrance open, ventilating the last frame requires driving air past 18 other frames; with the central entrance open — only past 9 other frames.) Whether to leave the side entrance open in addition to the central entrance depends on the strength of the colony and whether they will be able to guard two entrances against robbers. Normally only one entrance is open, others are fully closed. Two bottom entrances can be open only for very strong colonies if they exhibit overheating and there’s no top entrance. (If your hive has top entrance and bottom entrances, having the top entrance and one bottom entrance open is enough.)
Important note: in nature, bee nests usually have only one entrance and bees seal all other openings with propolis. Having more than one open entrance makes the colony more vulnerable to robbing and intruders (small hive beetles, wax moths, etc.), so shading the hive is a safer option than increasing the number of open entrances. A hive that cannot secure its border perishes — no exceptions.
10. Add foundation frames in front of the open entrance.
When adding frames of foundation, add them in front of the open entrance, not in the depth of the hive. This alleviates congestion, improves ventilation, and delays swarming. Note that you can achieve that by sliding the existing frames away from the open entrance to make room for foundation frames or by switching entrances (close the active entrance, open the one in front of the added foundation frames). For details, see Keeping Bees with a Smile, 2020 edition.
11. Gap after the last frame is good.
If you use a horizontal Layens hive (frame top bars touch), leave a 1/4” gap between the last frame and the wall (and the first frame and the wall) so air can rise under the lid and get vented out. Also, remove the divider board from a strong hive in very hot weather.
12. Prevent colonies from becoming overpopulated by making timely artificial swarms.
Very strong colonies are actually more prone to comb collapse: during the honey flow, the huge army of workers quickly builds new fragile comb and loads it with heavy nectar. If the hive overheats, these heavy newly constructed combs are very susceptible to collapse (especially if the hive is moved — see the next point). A strong congested colony also generates more heat and has a greater weight of workers hanging on each comb.
A strong overwintered colony will outgrow even a 20-frame Layens hive, and then swarm. Prevent extreme congestion by making artificial swarms (splits) on time — you can multiply your colonies and improve their health without sacrificing honey production. See Keeping Bees in Horizontal Hives (Section 163), Raising Honeybee Queens, and also our guide If Bees Run out of Room.

13. Move swarm traps and hives in the early morning.
If you have to move a swarm trap or a hive during very hot weather, preferably do so in the cooler temperatures in the morning, before sunrise, rather than in the evening, at sunset. This gives the hive a much-needed time to cool down, so wax in the combs won’t be as soft. Provide ample ventilation as discussed in Keeping Bees in Horizontal Hives (Section 74) and Raising Honeybee Queens. Use plenty of soft padding under the hive, and orient the hive so the top bars point in the direction of movement. Overall, moving a heavy swarm trap or a strong colony with lots of freshly built comb filled with nectar is particularly dangerous in hot weather — take all precautions.
14. Top bar hives are more prone to comb collapse.
I kept bees in top bar hives for many years and found them more prone to comb collapse than hives with frames. It is possible to avoid comb collapse in top bar hives even in very hot climates by following the principles described above, plus make sure your hive is well ventilated. If you’ve been struggling with comb collapse in top bar hives, consider trying a horizontal Layens hive with foundationless frames — these offer the same advantages as a top bar hive (bees build their own natural comb, etc.) but the frames give much better support to the heavy combs inside the hive and during handling, prevent comb attachment to the hive walls, and you can extract them in a honey extractor.
15. Use plastic foundation.
The “modern” answer to comb collapse is, of course, the use of plastic combs and foundation. We include this option here for completeness, but if you eliminate the causes of overheating as discussed above, you won’t need any plastic foundation. Georges de Layens was saying that many beekeeping inventions solve one problem while creating another, and plastic foundation undoubtedly falls into this category.
16. Exclude mice in the winter.
Protect the entrance of your hive with a mouse guard over the winter. Mice can destroy a lot of comb in a colony that is dormant and cannot defend itself. If you have a circular entrance, our stainless steel entrance discs have a special setting with 3/8” openings that allow bees to fly but keep mice and shrews away.

In summary: to prevent comb collapse in hot weather, put your horizontal hives in full shade. Alternatively, at minimum, paint them white (#4), shade the roof (#5) and open top entrance (#8).
How to Fix Comb Collapse
If comb collapse has occurred, do not delay the cleanup or you risk an infestation of small hive beetles.
Go over the entire hive and remove damaged frames and collapsed comb. Smoke and swipe all bees off these frames and place them in a bee-tight container like an empty swarm trap. Cut up collapsed comb, get bees off it, and put it in a bucket with a tight-fitting lid. Do not try to save collapsed brood combs by straightening them up and securing them in a frame — they may already be contaminated with small hive beetle eggs and tiny larvae, and should be removed.
Slide good frames to one end of the hive and clean the bottom, if necessary. If you see liquid honey on the bottom, bees sticking and drowning in it, collect as much as you can with a spoon, then sprinkle with water and wipe off with a rag. Does not have to be squeaky clean — just clean enough that bees don’t stick to the floor. Move quickly as delay may provoke robbing by nearby colonies — then it can get really bad for the hive in question (and for yourself).
If at any point you spot the queen, catch her by the “shoulders” (thorax) and put her in a queen cage or a glass jar with lid, in the shade. Return her to the hive and release at the end of procedure.
Put good frames back into the hive and add some foundation frames in front of the entrance. Eliminate causes of overheating.

If the collapse is extensive, the cleanup procedure is made much easier by using a new hive box. Put a new hive stand behind the hive and push it onto that stand. Put a new clean hive box on the old stand that is now empty. Move the good frames with all the bees on them from the “collapsed” hive into the new one, add a few foundation frames. Take the damaged frames and collapsed combs, shake/swipe the bees into the new hive, put damaged frames/combs away, then close the lid of the new hive. With the old hive now emptied of frames and comb, clean honey from the bottom, then examine the remaining bees on the walls carefully to make sure there’s no queen (if you see the queen, catch her by the thorax and put her into the new hive on a comb), then shake/smoke/swipe bees out in front of the new hive’s entrance, and remove the old box from the apiary. You can reuse it after cleaning and eliminating the causes of comb collapse.
Comb collapse cleanup is a major disturbance, especially if brood combs were affected and if most combs have been removed. If the colony is left with no brood comb at all, prevent the colony from absconding by putting the entrance gate to the queen excluder setting for a few days — of course this can only be done if you are certain that the queen is inside the hive following the cleanup. Note that queen excluder interferes with ventilation, so only use it following an extensive collapse that left no brood comb in the hive. If the hive lost most of its honey reserves, feed by giving a frame of honey from another hive or by feeding it back its own honey in a feeder.
Comb collapse cleanup may look like a daunting prospect, but the alternative of waiting is worse still, so just do it, and it usually brings good results. When all is done, you can almost hear a sigh of relief from the bees; bearding quickly subsides and bees get back to work. And it is your work to make sure this does not happen again.
The honeycomb removed during the cleanup is best processed using a stainless steel honey press.
Stay cool!

LAYENS HIVES & EQUIPMENT AVAILABLE FROM OUR STORE >>
Hives include all frames, fully assembled & ready to go
Many more guides are in progress, so please join our email list below for more free advice and important updates (no spam; only 2-4 emails per year, and you can unsubscribe at any time). THANK YOU! – we’re working hard to bring you the bees... and the smile!
— Dr. Leo Sharashkin, Editor of “Keeping Bees With a Smile”