


Convert Vertical Hives to Layens – NO JIGS REQUIRED! – Free Guide
LAYENS HIVES AND FRAMES AVAILABLE FROM OUR STORE >>
Hives include all frames, fully assembled & ready to go
You can easily convert your existing Langstroth hive or nuc to a horizontal Layens in 30 minutes. Not for the faint of heart, but the following procedure is quick, definitive, and works very well. It is a modern adaptation of Layens’s “direct transfer” technique described in his book.
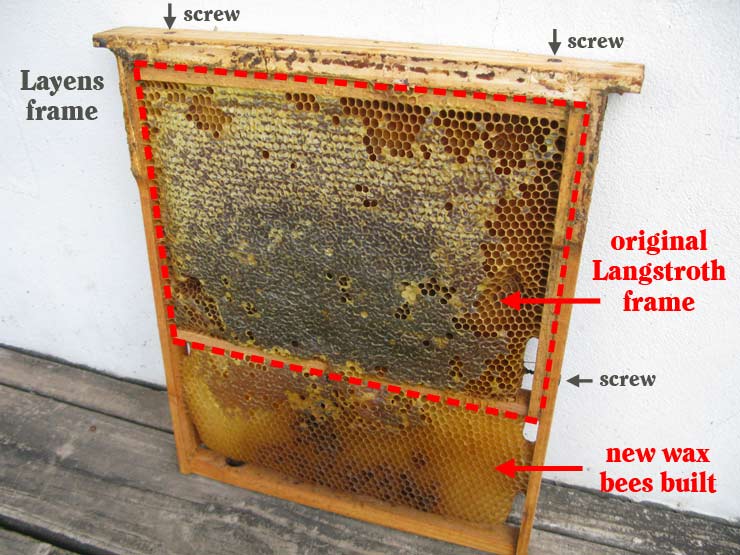
The basic idea is to cut the Langstroth frame, fit it inside an empty Layens frame, and attach with screws. The bees will fill out the remaining space with comb, making a neat Layens frame.
How it’s done
Prepare some empty Layens frames with no wires. Position an empty Layens hive next to the vertical Langstroth, with Layens’s entrance facing the same direction as the original hive. Better still, move the Langstroth hive to the side and put the Layens in the Langstroth’s original position — this way all the foragers will be returning straight into the new Layens.
Open the vertical hive and take off the supers, if any. Take a deep Langstroth brood frame and swipe all bees off into your Layens hive.
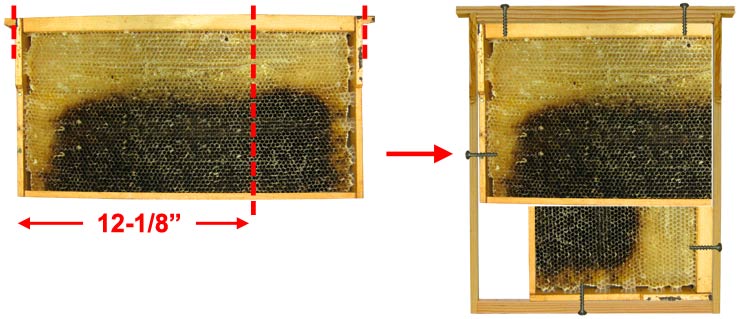
Cut off the lugs (“ears”) of the Lang frame, then pass the entire frame through a table saw (without the bees on it of course) to trim it to the inner size of the Layens, which is 12-1/8” or a bit less. Cut through the top and bottom bars, wax comb, embedded wires — everything. Then nest it in the Layens frame and attach with two screws through the top bar and one screw through the end bar, as shown. Coarse-threaded 1-1/4” black drywall screws work well. Save the cutoffs and install them two per Layens frame in the same way. Bees will take care of the rest.
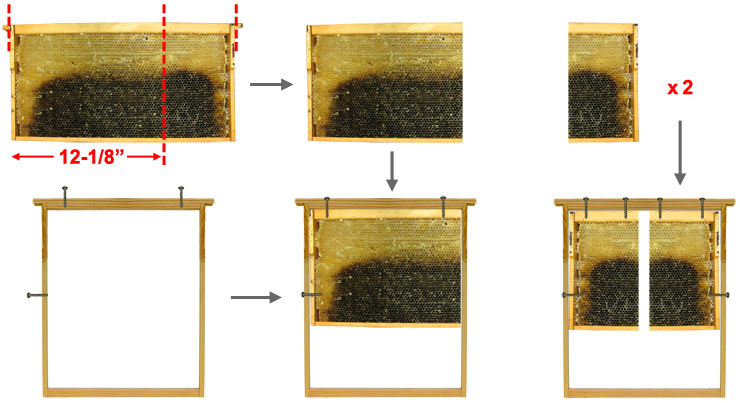
Repeat with all other frames, starting with brood. If you transfer medium Langstroth frames (6-1/4” deep), you can attach them in two tiers; the lower tier can be composed of two cutoffs if needed.
Transfer all brood. Honey frames are optional
It’s only essential to transfer all brood and, preferably, pollen, give bees a couple Layens foundation frames, and feed well. Note that you don’t really need to transfer honey in the comb unless you want to save the wax comb itself.
If a honey frame has no brood in it, it’s much less mess to extract honey first and then cut the frame with empty comb. You can feed the honey back to the bees using a Layens feeder (see below).
Tool alternatives
If there’s no table saw available close by, a chop saw, a reciprocating saw (“saws all”), or a circular saw can do the job. Note that any of these three tools have battery-powered versions that you can take to the bee yard. Handsaws and hacksaws are not recommended — it takes much longer, they don’t cut wires well, and the sawing motion mangles the comb.
Be safe
Operate all tools safely and wear all safety gear: gloves, earmuffs, and goggles. Goggles are especially important since you may be cutting through wood and steel wire and you don’t want a small piece of it in your eye!
Right timing: early spring
As with any transfer, do it fairly early in the spring, while the colonies are still small. Fewer bees, less brood and honey means fewer frames to transfer, but do wait until warm weather sets in and bees start bringing in nectar and pollen. (If you are transferring a nuc, do so shortly after delivery.) Complete the transfer in the afternoon on a nice warm day when most of the foragers are outside the hive.
The queen
If you can find the queen (great!), put her aside in a queen clip, or under a glass. This way you avoid the risk of damaging her in the transfer. If you don’t find the queen, she’ll probably be all right — just make sure to shake/swipe all the frames above the Layens hive; don’t drop any bees outside the hive. If you found the queen, introduce her into the Layens hive after the first couple frames with brood have been transferred. (Release her onto a brood frame.) After all the frames have been converted, finish by shaking/swiping all the bees from the walls of the Langstroth boxes into the Layens. Remove the Langstroth boxes from the apiary.
Be quick
Do the transfer as fast as possible. 15 to 30 minutes is a good time frame to aim at. This means that all frame-cutting is best done right there in the apiary. Predrilling 3/32” pilot holes in the Layens frame and pre-installing the screws helps speed up the actual transfer. If you can’t bring your table saw there, use another cutting tool (e.g., a battery-powered chop saw). If, however, you are converting frames that are not part of an active colony, you can do so at your leisure in a workshop with a table saw.
It’s helpful to have a helper: one person holds the frames while the other drives the screws in, etc. If you operate alone, have a flat surface (e.g., the hive roof) to lay the frames on while you are screwing them together.
Feeding
Feed the colony with a 1:1 honey-water syrup in a Layens feeder (unless you include enough honey on the frames). See the book Raising Honeybee Queens on the importance of feeding after any disruptive operation, and for proper dosage. Also take all precautions against robbing as described in the Layens book.
After the transfer: lock them up for 24 hours
To prevent absconding, it’s a good idea to confine the colony in the hive for 24 hours. Make sure they have ventilation and food and drink. Close the entrance with mesh after all the bees are inside in the evening of the day you did the conversion; reopen the following evening at sunset.
Limit the hive volume
Restrict the size of the horizontal hive using a piece of plywood. This is especially important if the weather/nights are cool or if you have small hive beetles. How many frames to give the transferred colony depends on its strength. Bees need to be covering the frames well. A very strong colony can start with 10 Layens frames plus a feeder; smaller colonies receive fewer frames. Check them after a few days and add more frames when they almost filled the empty space under the converted Lang frames and are working well on foundation frames.
Nest the entire Langstroth frame in Layens
One more option for nesting the cut Langstroth frame inside the Layens is to rotate the small cutoff 90° and fasten it under the big piece (picture below). But for this to work, you need to trim the end bar of the small Langstroth cutoff to the uniform width of 1” so it does not stick out outside the Layens end bar. This means more cutting (slowing you down) and really requires a table saw to do well — so reserve this option for converting your inventory of empty Langstroth frames; for an active-hive transfer, attach two cutoffs per Layens frame as shown above.
Also works with top-bar, Warre, etc.
You can use exactly the same approach to quickly convert your top bar hive or your Warre hive to the Layens. Just cut the top bar with comb to 12-1/8” wide, fit inside the Layens frame, and screw to the top bar. Done!
You’ll love it!
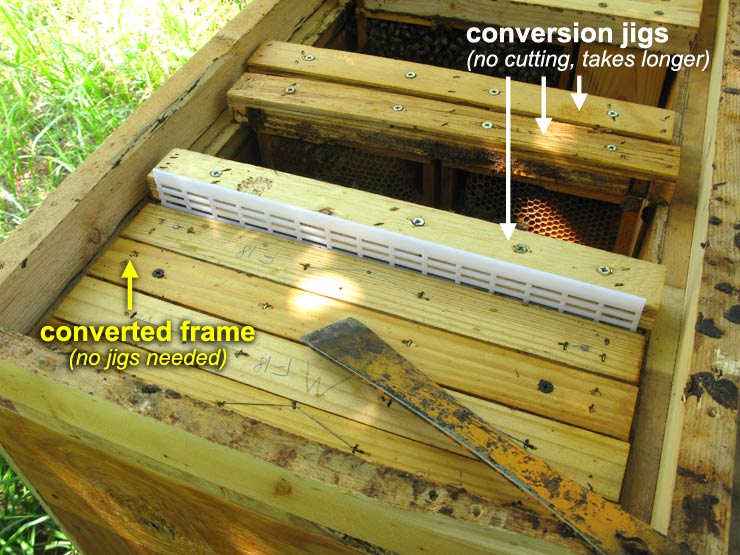
This method is very reliable and works really well. But if you find the prospect of cutting comb of an active colony too intense to your liking, consider a different approach that involves no cutting but calls for conversion jigs. After completing numerous transfers using different methods, the one described on this page is our favorite: very quick, the most reliable, and offering best results.
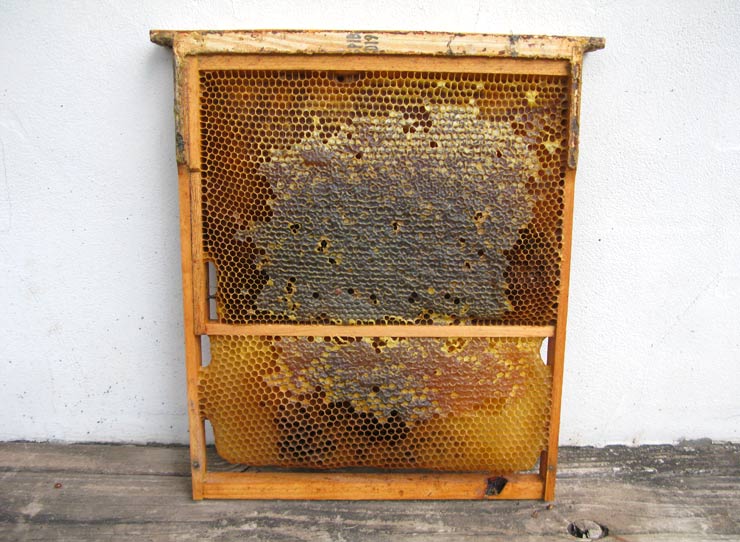
Once the converted frames are in the hive, you can tell them by the screws in the top bar. The bees will add comb to the converted frames; these can be extracted the same way as any other Layens frame, and you can keep using them for many years.
LAYENS HIVES & FRAMES AVAILABLE FROM OUR STORE >>
Hives include all frames, fully assembled & ready to go
Many more guides are in progress, so please join our email list below for more free advice and important updates (no spam; only 2-4 emails per year, and you can unsubscribe at any time). THANK YOU! – we’re working hard to bring you the bees... and the smile!
— Dr. Leo Sharashkin, Editor of “Keeping Bees With a Smile”