


Hive Stand for Insulated Layens Hive – Free Plans
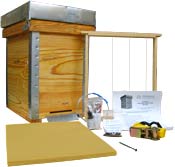
INSULATED LAYENS HIVES & FRAMES AVAILABLE FROM OUR STORE >>
Hives include all frames, fully assembled & ready to go
We were doing some remodeling (who is not afflicted with this terrible scourge?) and my wife asked for a new toilet bowl. Nothing was really wrong with it, except flushing resulted in the contents spilling over the floor — the outlet calcified shut after 40 years of heavy use. Vinegar, strong acids, and a plumber all failed to unblock it, so I conceded it needed replacement, especially with my mother-in-law coming to visit next week.
As I was hauling it off for disposal, it dawned on me that it could make a perfect hive stand! The right size, heavy, stable, and will literally last a thousand years. So I drilled a few weep holes so water does not collect and freeze inside, installed a hive on top, and called my wife to admire my invention that could keep millions of old toilet bowls out of the landfill. It looked gorgeous!

She said it was a great idea, but... if I did not want our bee yard to look like a bee junk yard, it wouldn’t actually work. I knew she was right, so I sighed and built a hive stand out of wood.
As discussed in Keeping Bees with a Smile, metal hive stands are actually the best. They last a lifetime; no rotting or termites; easy to move; recyclable; scrap metal to build them is widely available (old bed frames work great). But they require welding equipment and skill.
Masonry hive stands are permanent. Just support each end of the horizontal hive with a couple cinder blocks, and voila! But they are heavy to install, take more time to level, and don’t look as nice. (If you do use them, make sure to put a board between the block and the hive bottom, or the moisture trapped between the concrete and the hive will degrade the wood.)
Wooden hive stands are the easiest to make, and they will last a long time if you use rot-resistant wood for legs (I use eastern red cedar). Avoid pressure-treated lumber.
Here is how I make stands for the Layens insulated hive. A similar design will work for other horizontal hives — just make sure the width and length of the stand is slightly less than the hive’s bottom. This way the walls of the hive form a small overhang and most of the rainwater drips down instead of getting between the hive and the stand and causing rot.
Material list
- 2” x 6” x 8’ softwood board (pine, fir, etc.), untreated (actual dimensions: 1-1/2” x 5-1/2” x 8’)
- 2” x 4” x 8’ softwood board (pine, fir, etc.), untreated (actual dimensions: 1-1/2” x 3-1/2” x 8’)
- 2-1/2” or 3” deck screws (24)
Hive stand dimensions
- Length: 33-3/8”
- Width: 17-7/16”
- Height: 16”
Building instructions
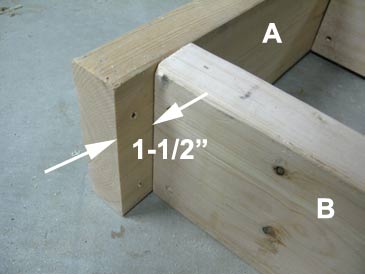
Step 1. Cut the 2” x 6” board into four pieces: 17-7/16” (2 parts A) and 30-3/8” (2 parts B).
Step 2. Put B between A on a flat surface, B recessed 1-1/2” from the end of A as shown. Check for square corners and drive two deck screws per corner through A into B.

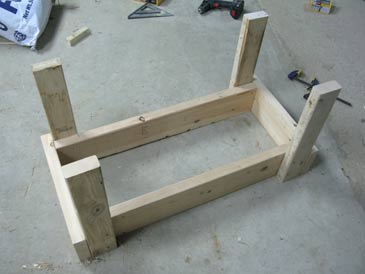
Step 3. Cut four 16” pieces of the 2” x 4” for legs. The length of the legs should make the hive convenient to work with: not so low that you have to bend over, and not so high that you have to reach to take frames out. Most people will like hive stands in the 14” to 16” range, plus a 1” leveling stone under the leg. With the insulated Layens hive (which is 19” tall) it means the frames’ top bars will be 34” to 36” above ground — the convenient height of the standard workbench or kitchen countertop.
Step 4. Put a leg in the outside corner formed by A and B. Check to make sure the leg is square relative to both A and B. Attach with two screws through the leg into B, and two screws through A into the leg. Repeat with the other legs and you are done.

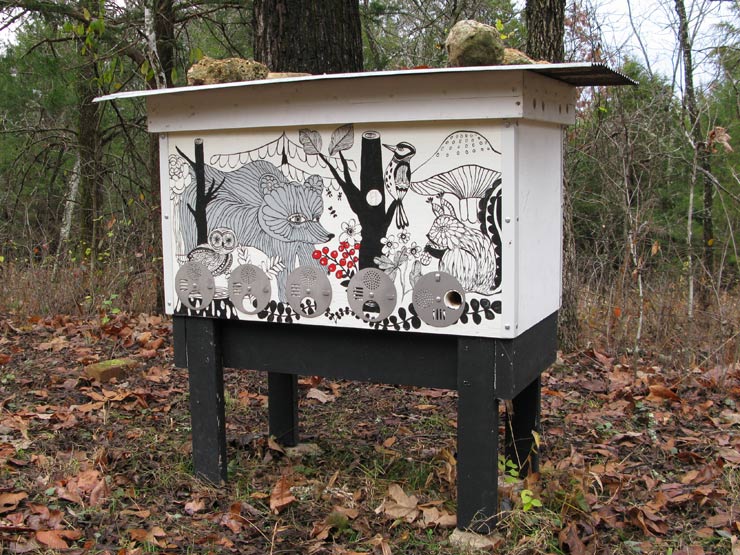
Paint the hive stand
If the hive stand is not made of rot-resistant wood, it will last longer if painted. This is especially critical for the lower portion and the bottom of the legs. If you used treated lumber for the hive stand (not recommended), it must be painted to prevent bees’ contact with the treated wood. As with the hive box, I use acrylic primer and two coats of exterior acrylic house paint.
Treat the legs with motor oil
Instead of painting, another option is to take four plastic containers (like from 32-oz yogurt), pour in 1” of fresh motor oil (not used motor oil), and set the legs in these cups for a couple days to soak up the oil and become more water resistant.
Use flat stones to level the stand
Finally, when leveling the hive stand in the apiary, putting a flat stone under the leg helps slow down rot and termite damage. Instead of bricks or manufactured pavers, give preference to natural flat stones with slightly uneven surface that allows water to drain more easily from under the leg. Even if you use rot-resistant wood for legs, using the stones underneath is beneficial, preventing the legs from sinking into the ground.
Stake the stand to the ground
In high-wind areas or where animals (horses, cows, deer, bears) can bump into your hives, anchor the stand to the ground. For example, drive 4’ pieces of metal T-post 2’ into the ground at two diagonally opposite legs and tie legs to the posts with metal wire. Then, pass a strap under the middle of the stand and over the hive lid, and ratchet-strap the stand and the hive together.
Postscriptum
If, unlike me, you are not socially inhibited from using toilet bowls for hive stands, send me some pictures to warm my heart! Handle toilet bowls carefully as they easily crack if dropped. Drill 1/8” weep holes in the bottom of each inner cavity, including the bowl rim. Otherwise freezing water will crack the bowl, ruining your thousand-year hive support. If using a masonry drill bit, continuously pour water on it, but it will still burn out after a few holes. Diamond-tipped porcelain-cutting drill bits and hole saws work better.
INSULATED LAYENS HIVES & FRAMES AVAILABLE FROM OUR STORE >>
Hives include all frames, fully assembled & ready to go
If you haven’t signed up for our email list yet, please join it below so we can notify you when detailed Layens hive management recommendations and more free plans become available. (Only 2-3 emails per year, and you can unsubscribe at any time.) We are working to bring you the bees... and the smile!
— Dr. Leo Sharashkin, Editor of “Keeping Bees With a Smile”