


Insulated Layens Hive – Free Plans
INSULATED LAYENS HIVES & FRAMES AVAILABLE FROM OUR STORE >>
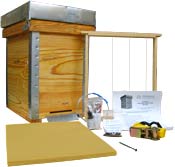
Hives include all frames, fully assembled & ready to go
This insulated Layens hive is the best hive we’ve ever built. It has 10 times the insulation value of conventional hives, mimicking the environment inside the natural home of honey bees, the tree hollow. The generous 1-1/2” of natural wool thoroughly protects the bees from both the excessive heat and from the cold, as well as temperature fluctuations detrimental to the brood in the spring. The Layens hive remains the most popular deep-frame horizontal hive in the world (over one million hives in use). This particular model accepts 20 Layens frames and is a result of many years of testing in our apiaries. It offers the best performance and durability and is now our model of choice for both cold and hot climates. The completed hives are available from our Store.

MATERIAL LIST
- 11/32” plywood, untreated, 4’ x 8’. 4 sheets make 3 hives (if you only build one hive, get 2 sheets)
- 2” x 4” x 8’ softwood board (pine, fir, etc.), untreated (actual dimensions: 1-1/2” x 3-1/2” x 8’)
- 1” x 4” x 8’ softwood board (pine, fir, etc.), untreated (actual dimensions: 3/4” x 3-1/2” x 8’)
- 1” x 4” x 6’ softwood board (pine, fir, etc.), untreated (actual dimensions: 3/4” x 3-1/2” x 6’)
- Aluminum trim coil, white, 24” wide x 42-1/8” long (usually comes in rolls 24” x 50’)
- Aluminum angle, 3/4” x 0.05” x 8’
- 1” narrow-crown staples or nails
- 1/2” lath screws with sharp point (40)
- 2” deck screws (4)
- 1-5/8” deck screws (8)
- 1-1/8” or 1-1/4” drywall screws, coarse thread (16)
- T50 staples, 3/8” leg (20)
- Metal mosquito screen (aluminum or stainless steel), 2” x 4” (4)
- Insulation. Raw sheep wool recommended, 7 lb per hive — available from our Store
- Wood glue
- Acrylic primer, 1 pint
- Exterior acrylic house paint, light color, 1 quart enough for several hives
TOOL LIST
- Table saw with 3/32” kerf blade
- Circular saw
- Miter saw (optional)
- Air compressor with staple gun (or a hammer)
- Drill with an assortment of wood bits
- 1-1/2” hole saw (or paddle drill bit)
- Screwdriver
- Belt sander
- Angle grinder
- Stapler for T50 staples
- Clamps (optional but helpful)
- Tape measure
- Square
- Pencil
- Paint brush and/or roller
BOX DIMENSIONS
- Interior L 13-3/4”
- Interior H 16-3/4”
- Interior W 31-7/8”
- Exterior L 18-1/8”
- Exterior H 18-15/16”
- Exterior W 36-1/4”
- Volume 120 liters (32 gallons; 7340 cubic inches)
- Overall wall/bottom thickness 2-3/16”
PART LIST
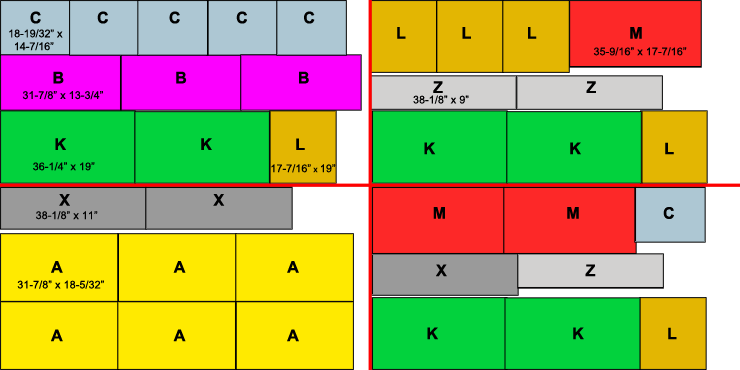
Plywood panels, 11/32” thick
| A (2) | 31-7/8” x 18-5/32” | front and back wall, interior - NOTCHED |
| C (2) | 14-7/16” x 18-19/32” | end walls, interior - NOTCHED |
| B | 31-7/8” x 13-3/4” | bottom, interior |
| K (2) | 36-1/4” x 19” | front and back wall, exterior |
| L (2) | 17-7/16” x 19” | end walls, exterior |
| M | 35-9/16” x 17-7/16” | bottom, exterior |
| X | 38-1/8” x 11” | top cover element |
| Z | 38-1/8” x 9” | top cover element |
Lumber (untreated softwood stock)
| G (2) | 35-9/16” x 1-1/2” x 3/4” | base support frame, long - NOTCHED |
| H (2) | 17-7/16” x 1-1/2” x 3/4” | base support frame, short - NOTCHED |
| R (2) | 35-9/16” x 1-1/2” x 3/4” | upper rim, long |
| S (2) | 14-7/16” x 1-1/2” x 3/4” | upper rim, short |
| E | 31-7/8” x 1-1/2” x 2-3/4” | entrance block |
| N | 17-13/16” x 1-1/2” x 3/4” | stud, back wall |
| P | 13-9/16” x 1-1/2” x 3/4” | stud, front wall |
| W (2) | 38-1/8” x 3-1/2” x 3/4” | top’s frame, long |
| U (2) | 19-1/4” x 3-1/2” x 3/4” | top’s frame, short |
| F (2) | 36-9/16” x 3/4” x 3/4” | slats for propping up the top, long |
| T (2) | 16-15/16” x 3/4” x 3/4” | slats for propping up the top, short |
Metal
| J (4) | 18-13/16” x 3/4” x 0.05” | aluminum angle for corners |
| Q | 42-1/8” x 24” | aluminum trim coil, white (for the roof) |
| V (4) | 4” x 2” | insect screen, aluminum or stainless steel |
Insulation
BUILDING INSTRUCTIONS
All joints are glued and stapled/nailed, unless otherwise indicated.
Step 1. Cut plywood to make parts A (2), B, C (2), K (2), L (2), M, (2), X and Z. Make the best use of materials by cutting parts for three hives from four sheets of plywood as shown.
Step 2. Cut the 2” x 4” x 8’ board as shown below. Make parts G (2), R (2), S (2), H (2), N, P, and E. The width of all pieces except E is 3/4”. It is exaggerated here to make the drawing easier to read.

Step 3. Parts H and G — cut a dado (slot) 3/4” wide by 3/4” deep, 1-27/32” from each end.

Step 4. Parts A — notch lower corners. Notch 13/16” wide x 1-9/16” deep.
Step 5. Parts C — notch lower corners. Notch 1-3/16” wide x 1-9/16” deep.

Step 6. Lay parts H with the dadoes (slots) facing up. Insert parts G into parts H to form a frame.


Step 7. Align the edges of B with the edges of G, H. Attach B to the G-H frame. Flip over and fill with insulation.


Step 8. Align the edges of M with the butt ends of G, H. Attach M to G-H frame. If any ends of G, H protrude beyond M, sand them down so they are flush with M.


Step 9. Align the right and left edges of A with B. Attach A to G. Repeat for the second A panel.


Step 10. Align the edges of C flush with the outside edge of A. Attach C to A and H. If any staples blow out of A, grind them down with an angle grinder. Walls A are 7/16” lower than walls C. This recess will form the frame rest.


Step 11. Align S with the top edge of C. The narrow side of S touches C, and the ends of S are flush with the right/left edges of C. Clamp S to C and attach (glue and staple through C into S). Repeat with the other S and C.


Step 12. Attach R along the top of A — glue and staple through A into R. The ends of R are flush with S. The top surface of R is flush with the top surface of S. A rabbet 11/32” wide x 7/16” deep is formed by the top edge of A and the side of R. Repeat with the second R and A.
Step 13. Connect all four R-S corners by pre-drilling through R into S, making a countersink (depression for the screw head), then driving in a 2” or 2-1/2” deck screw.


Step 14. Position the ends of E over the protruding H. If E is thicker than the H protrusion, sand down the entire length of E so it’s flush with the butt end of H. Attach by gluing and driving staples through A into E. Only use 4 staples for now, 2 on each end of E, 1” from C. Do not drive staples all along the length of E or they will interfere with the drilling of entrance holes.
Step 15. Center P on the A panel over E. Attach P to A (glue and staple through A into P). Center N on the back A panel, attach (glue and staple through A into N).


Step 16. Fill one end with insulation. Align L with R, S, M. Importantly, the top of L must be flush with the top surface of S. Attach L to R, S, M, G. Repeat with the other end. Don’t let insulation get between the plywood edges as you glue and staple them together.


Step 17. Fill the back with insulation. Align K with R, L, M. The top of K must be flush with the top surface of R. Attach K to R, L, M, N, H.
Step 18. Fill the front with insulation. Align K with R, L, M. The top of K must be flush with the top surface of R. Attach K to R, L, M, P, H.


Step 19. Drill 3 entrance holes, 1-1/2” diameter, 3” on-center from the bottom edge of K. Drill at a slight incline so it sheds water. Hole distances, on-center: 5-1/4” from each end of K, and one in the middle (18-1/8” from either end). Staple around each entrance: 4 staples on the outside and 4 staples on the inside. The box is ready.


Don’t work too hard. Take a tea break with some honey cakes.

Step 20. Cut parts W (2), U (2), F (2) and T (2) out of the “one-by-four” boards. (W, W, and U are cut from the 1” x 4” x 8’ board, and the remaining parts — from the 1” x 4” x 6’ board.)
Step 21. Cut rabbets 3/4” wide x 3/8” deep on both ends of each W.
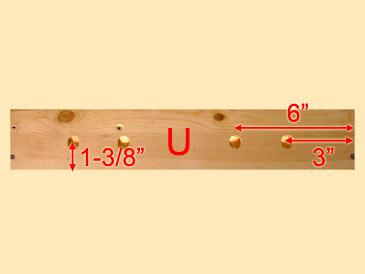
Step 22. Mark the edge of U that will be outside and bottom once assembled into a lid. Drill four 5/8” holes in each U: 1-3/8” on-center from the bottom edge of U and 3” and 6” from each butt end. Drill at and incline so it sheds water. On the other (inside) side of U, cover the openings with metal insect screen V and staple into place.
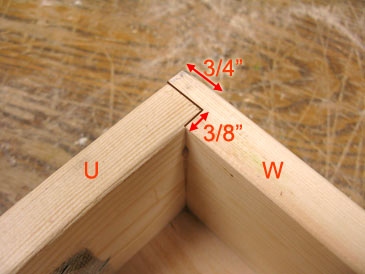
Step 23. Place U into the rabbets in W, square, predrill and attach with glue and 1-5/8” screws, two per corner.
Step 24. Attach X, Z to the U-W frame.


Step 25. The hive lid is supported in the propped-up position by four slats F (2) and T (2), attached to the inside of the lid. Predrill 5 holes in F and 3 holes in T. Make a 2-3/8” x 8” spacer from some scrap plywood. Put the lid upside down. Position the spacer against X or Z, put F over it, and drive the screws into the pre-drilled holes, starting from one end. Move the spacer as you go. Repeat with another F. To attach T, drive in the central screw first. Before driving in the end screws make sure the upper surface of T is flush with the upper surface of F. When attached, the F and T are recessed 3/8” from the edge of the lid.


Step 26. Paint the outside of the hive box (walls and bottom, including the top edge of K, L) and outside and bottom surfaces of U and W, plus F and T. Apply one coat of primer and two coats of paint. Pay special attention to all edges. Light colors are preferable. If you live in the south, avoid very dark colors to prevent overheating. A roller is the most convenient tool for painting hive boxes. Note: do not use oil-based paint on your hive. Wait 24 hrs after the final coat.
Step 27. Center the top over the roofing material Q, score the perimeter, and notch Q as shown. Fold Q using a box metal brake, or just pushing it against the clamped lid (tapping with a rubber mallet or a block of wood helps). Attach with lath screws.


Step 28. Position the entrance discs with the round hole over the entrances. The screw hole should be centered over the entrance hole. Attach with lath screws. Cover the edges of the hive box with aluminum angle J and attach with lath screws, six per corner (3 on each side – 1” from the top, in the middle, 1” from the bottom).


DONE! Ask your honey to decorate the box, add a spring swarm of bees, and be blessed!

INSULATED LAYENS HIVES & FRAMES AVAILABLE FROM OUR STORE >>
Hives include all frames, fully assembled & ready to go
If you haven’t signed up for our email list yet, please join it below so we can notify you when detailed Layens hive management recommendations and more free plans become available. (Only 2-3 emails per year, and you can unsubscribe at any time.) We are working to bring you the bees... and the smile!
— Dr. Leo Sharashkin, Editor of “Keeping Bees With a Smile”